Wednesday, 31 May 2017

Sketchup - Keychains + Spinner

Sketchup 2017

---your goal is six 3D models---


Sketchup 2017
  • load the extension:  windows- extension manager - select sketchup-stl-2.1.6.rbz

Definitely read this: 3D Printing with Sketchup

Marks for each project:

  • post image of (coloured) sketchup image add URL
  • post image of STL file in MakerBot add URL
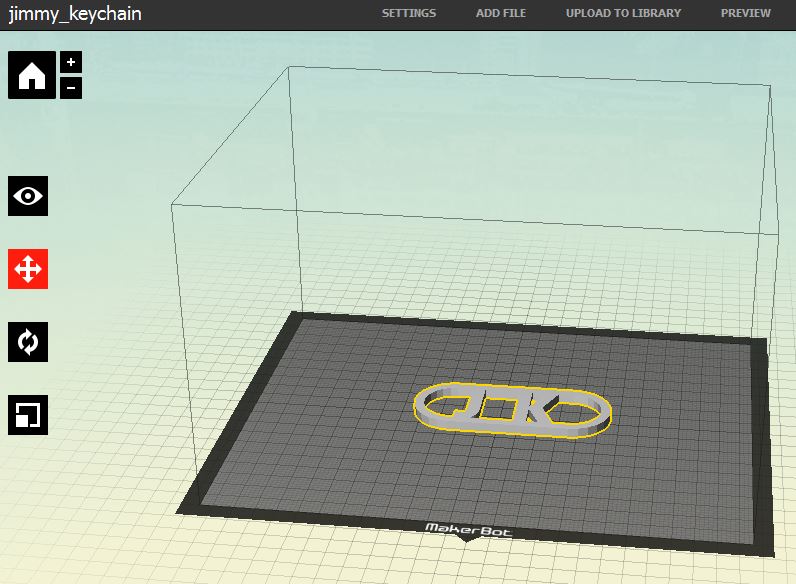
NOTE!!! If the parts of the model appear misisng in makerBot - go back to Sketchup and add a new extension "MakePrintable"


  • create link in blog post to STL file

1. The following Tutorial is for the first 3 
Key Ring projects 
  • #1 Do it once with your initials
  • #2 Do it again with a design you draw in the middle of the OVAL 
    •  3D drawing
    • must be touching edges and/or eachother
  • #3 Do it thrice with a downloadable item from the 3DWarehouse  - inside the OVAL

3D Keyring tutorial (oval with Initials)
3D Keyring tutorial - SketchUp - CRTHS
...note group object before export as STL


2. Import and trace models (Key ring #4 and #5)
  • Do 2 different models
Import a fairly complicated image  - trace it then push/pull it.
Add the OVal that would make it into a keychain.
Post - along with 

  • Sketchup image, 
  • makerBot image, 
  • STL file 
  • ADD the original image


Ideas from:  ... last years Digital Media Blog
http://eqsheppardmedia.blogspot.ca/2016/05/key-chains-part-2.html

The following tutorial describes how to load an image then trace the design into a 3D printable solid.
You may choose any design you wish.

3D Printed Cookie cutters
http://danieltal.com/3d-printed-cookie-cutters/


FINALLY
#6

Hand spinner - fidget spinner - LD Spinner


Design your own
----

design must also contain the caps

IDEAS


dog theme
marbles for weight
Sun Ray theme
NOTE - cap forms bearing
random Number generator
bolts for weight
all bearings capped ninja theme
wind turbine
yin-yang theme
tool spinner

Friday, 12 May 2017

Friday Post May 12 - frame animation


 - Let's do this frame animation tweening tutorial
 - Take Several Screenshots/snipping tool of your progress in Photoshop - add your URL
-  add a caption under each screen shot
-  post the final gif


Animation "heartbeat" photoshop cs3


  • Add a background and foreground

1. create heart shape
2. add f/x


3. Time line and duplicate
4. tween for 1/2 heartbeat


5. second tween for the rest of hearbeat
6. add ribs and background


final product D


Final Product C


Final Product B

Tuesday, 9 May 2017

Photoshop FRAME Animation


1.                   Adobe Photoshop Animation Tutorial
-no AUDIO

LINK


Add a background- URL - other features to make it your own.


2.a Repeat the tutorial - add details - add the opponent -  throw the ball - explode


2.b  fight with TWEEN animation - a beginning - a middle - an end

_-_-_-_-_-_-_-_-_-_-_-_-_-_-_-_-_-_-_-_-_-_-_-_-_-_-_-_-_-_-_-_-_-_-_-_-_-_-_-_-_-_-_-_-_-


3.                   Animation "heartbeat" photoshop cs3

LINK

 
Add a background and foreground

4. Following the heartbeat tutorial 
Living parts

Find a skeleton and place these into it.


_-_-_-_-_-_-_-_-_-_-_-_-_-_-_-_-_-_-_-_-_-_-_-_-_-_-_-_-_-_-_-_-_-_-_-_-_-_-_-_-_-_-_-_-_-
5.         Photoshop Tutorial - How To Create an Animated GIF


6. It takes off - it flies - it lands 
- a different moving background for each 


7.  Choose a story:   DarwinAwards

break it down into scenes
animate it with all the tools you just learnt
in addition to your URL
add plenty of comments
to explain what is happening

  • use real images
    • use puppet warp to move them (flying animation)
  • use drawn images
    • use 'make frames from layers' (Rasengan)
  • From images on separate layers 
    • use tweening to animate each separately (Tween animation - volleyball)
  • multiple moving backgrounds to suite each scene change
  • tween for smoothness and realism
  • use layer effects as well (Heartbeat)
PHOTOSHOP SCREEN SHOTS AS YOU CREATE (just like the friday post)
The Bricklayer's Disaster
 

Mythbusters- Barrel of Bricks


Thursday, 27 April 2017

Instructional School Video/Slideshow

1. Choose to create either an Instructional Video OR an Instructional Slideshow

From one of the other courses you are taking this semester or from an interest you have.

2. Choose to create your own OR coordinate with a teacher to capture their lesson (pictures or video).

PLAN IT OUT

It is very important to understand the SKILLS involved and the ORDER in which they play out.

3. Think through the lesson
 -   then   -   
Map it out : Persuasion Map


---------------------------------------------------------------------------------------------------------------------

 of  YouTube videos


How to change a car battery


how to build a simple electric motor


How to make small wooden box EASY, FAST


How To Transfer Pictures/Videos From iPhone To Windows PC


How to Make Buttermilk Scones - Lemon Blueberry Scones Recipe


Solving Quadratic Equations by Factoring - Basic Examples


How To Serve In Tennis In 7 Steps


How To Make A Pinch Pot


HOW TO PLAY GUITAR FOR BEGINNERS : PLAYING EXERCISE 1 FOR BEGINNERS


Tutorial VIDEO Paper Toy


Learn to create the toy
Video creating the Toy - (Talking is good option)
Edit the video:  Captions, blog URL, Title, Name and sf/x
POST video  -  MUST BE EMBEDDED
 - not just a link to YouTube -


If you choose "EASY" then you will need to do 2.

1. Paper 'Catapult' (EASY)  LINK


2. Paper Popper! (EASY)  LINK


3. Transforming Ninja Star!(EASY)  
8 point  SUPER 4 point 16 point 6 point


4. Paper Toy Transformer (Challenging) LINK


https://denisegaskins.com/2009/11/30/cardstock-geometry-puzzle/
http://www.handimania.com/diy/paper-toy-transformer.html

Templates : https://mathsclass.net/files/crazy-paper-thing.pdf
http://www.handimania.com/uploads/paper-toy-template.png


5. Trihexaflexagon (Challenging)  LINK

Templates:

http://www.puzzles.com/hexaflexagon/img/blank_trihexaflexagon_template.pdf


6. Rotating Tetrahedron: (Challenging) LINK


7. Magic spiral cube (Challenging) LINK


8. 3D Origami Transforming Ninja Star LINK

 9. moving cubes (Difficult) LINK


10  double star flexicube (Difficult) LINK


Monday, 24 April 2017

Instructional Slideshow

Create the following toy
out of paper

you will need to create and recreate this toy enough times so you can demonstrate the process without mistakes.

start with making - 4
This will require only 2 sheets of paper.


http://www.wimp.com/how-to-make-a-toy-with-a-small-piece-of-paper/


NOW - recreate this toy 1 step-at-a-time
your partner will photograph the progress and Vise-versa
-make sure your face is in at least 1 picture

Create a slide show - add the captions


1. Make an instructional SLIDE SHOW
  • Take pictures of the tools
  • Take pictures of the progress
  • Take pictures demonstrating how it works.
  • Post pictures as a slide show
    • SEE instructions at the BOTTOM of this POST
    • each picture must have:
      • blog address
      • caption (VERY IMPORTANT)


INSTRUCTIONS for slideshow
Place images of the making of each toy into separate Dropbox folders.
Go to PowerPoint – chose Insert-Photo Album
Choose all your images – 1 per page – fit to slide
Make changes as necessary - Add blog address and captions

Save the PowerPoint presentation to your dropbox.


Insert  - import slides – upload your album from dropbox
Select all the slides and keep the theme

Once your happy with it - Check for blog address and captions - Choose – files – publish to the web


Paste into the HTML section of your blog post.


Monday, 10 April 2017

Minecraft Slideshow & Video

Create slideshows using Minecraft

1. Building the object               (your best 20 screenshots)
2. Showcase final product (inside too)   (10 sec video with captions-edit with movie maker)


VIDEOS uploaded to YOUTUBE need to be made PUBLIC

3. Place the image below in your post.

Day 1 Title: MC Coffee slideshow


NOTES: This is an Espresso Machine

Build the coffee cup first. Then build the machine to pour lava into the coffee cup. Have WATER enter somewhere on top. You should be able to go inside.

Day 2 Title: MC Still slideshow


NOTES: This is a Still

Build the GLASS cup first. The machine on the left creates alcohol fumes (LAVA) which flow into the ice container in the middle. Liquid alcohol (WATER)  then flows into the glass.


Do the following if you DO NOT need to catch up on previous assignments

Day 3 -Bonus slideshow and Video of the Smoothie Machine
 - must be flowing

Day 4 - Bonus Slideshow and Video of the PancakeBot
 - create a TRUMP shaped pancake


If you are planning to work as a team:

  • You must take your own screenshots. 
  • Each screenshot must have your blog address on it.
  • One person start a new world
    • Superflat world - cheats
  • When opening to LAN - set it up as 
    • Spectator - no cheats
    • then only assign 'creative' to very specific players.
    • /gamemode creative username


INSTRUCTIONS for slideshow

Place screenshots of "building it" and "the showcase" into separate Dropbox folders.
Go to PowerPoint  – chose Insert-Photo Album
Choose a folder then all the images – 1 per page – fit to slide
Make changes as necessary - Add blog address and captions
                   (Describe what is new about each slide)

Save the PowerPoint presentation to your dropbox.
goto:

choose:
Insert  - import slides – upload your album from dropbox
Select all the slides and keep the theme

Once your happy with it - Check for blog address and CAPTIONS- Choose – files – publish to web


Choose Publish click EMBED tab to get embed code

looks like:

<iframe src="https://docs.google.com/presentation/d/1olerY6uldUCSkgaXJ9XeSw2uIhtww10maaXnVYepw10/embed?start=true&loop=true&delayms=1000" frameborder="0" width="480" height="299" allowfullscreen="true" mozallowfullscreen="true" webkitallowfullscreen="true"></iframe>


Paste into the HTML section of your blog post.